In this lesson, we are going to go over how to get started. It is very important to be able to observe carefully what the conditions are in your yard or garden. Very often people rush to add or change things without really looking at how things are at the start. Sometimes it can be helpful to just spend 15 minutes just looking at the space before starting the design. Where is the sun, the trees, the wind? How are existing plants doing? Is there any washout or is there retention of water in any areas. If you have a difficult area, look to see why it is difficult. Too much sun? Too little water? Grade of the area sloping too much and water flows by? The most important part of a design is the starting point and a proper assessment of what your existing situation is. Here are some points to consider before you choose plants.
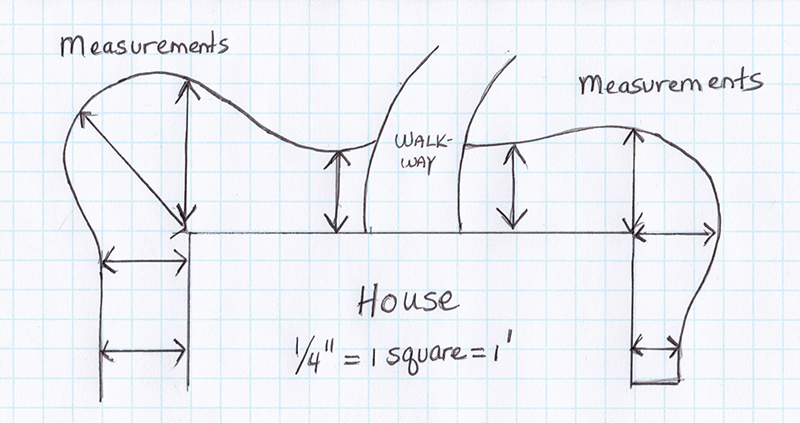
1. Measure the space you are going to design and transfer this onto a piece of graph paper (1 square = ¼” = 1 foot). Click here for a paper to print out, or you can go to an office supply store like Stapes and get a pad of graph paper. Using each square as 1 foot will make it easier to draw your space. If you have curvy beds make sure you measure how wide they are at the narrowest part and then at the widest part and make your curves.

2. Go outside in your garden and observe. If there are plants growing there, write down what and where they are on your graph paper. This may give you a clue as to what to add in regards to growing conditions. Example: if you have Hostas growing well in an area, then you know other shade plants will probably do well too. If you aren’t sure what the plant is, you can use one of the plant ID apps available such as LeafSnap or PlantSnap (many others). You can also always email us or bring a photo in and we can usually identify it. If you have perennials in your beds, they may have died back completely so you might have to rely on your memory or a photo of the space from the summer, or wait until they start to grow again this spring.
Next is getting down to some nitty-gritty details. Dig down into the soil and look at it. Is there loam and how much? Do you have sand or clay? This is vital to proper planting to know how much you need to amend the soil when you start planting. Check to see if there are any drainage problems i.e. water settling in areas or beds where the water rushes by. Both should be handled before adding plants. Also, if your plantings are near a structure, are there gutters? If so, are the downspouts piped far enough out so they don’t wash out the soil? If no gutters, how will the water be handled coming off the roof? This can be devastating to new plantings.

3. Now it is important to figure out how much sun your planting areas will get. Here is a great trick! Divide your yard into 4 sections and write down these 4 times in each section:
9:00 AM
12:00 PM
3:00 PM
6:00 PM
Then, walk out in the yard at the designated times and note if there is sun in each section. If you are doing this in the winter, you have to keep in mind that the sun is higher in the sky (47 degrees higher) in the summer. Additionally, the deciduous* trees are without leaves in the winter so summer will have a great deal more shade around the trees. This can be a real challenge to predict the sunlight in a given area. It would be very helpful if you are going to be landscaping your entire yard to chart it all out in the summer so you know the sun conditions in the summer months. If you are just focusing on one garden bed, you should be able to get a sense of how much sun it gets every day.
Here is the guideline for plants:
Full sun – Plants need at least 6 hours of direct sun daily. Part sun – Plants thrive with between 3 and 6 hours of direct sun per day.
Part shade – Plants require between 3 and 6 hours of sun per day, but need protection from intense mid-day sun.
Full shade – Plants require less than 3 hours of direct sun per day.

4. If you have existing plants, decide which you want to save, which you want to move (if it is practical) and which you want to get rid of. These decisions may change as you get going on the design but at least it is a start. There are probably definite decisions you can make and some may depend on what you are going to do. Keep in mind that an existing plant is probably going to be much larger than any new plants added. If that is the case, you may need to “balance” the bed. More on that in later lesson.
Here are some suggestions for tools that will help you draw with.
Pencil
Ruler
Graph paper – We prefer 11×17 sheets because they give you a lot of room for design
Landscape Design Templates – great for drawing in plants
Conclusion: So spend a little time really looking at what you have in your yard. Get it all on paper with notes and ideas that you come up with while you look. Have fun and get ready for the next lesson.
*Deciduous – of a tree or shrub, shedding leaves annually